| Graphics |
  |
Adding Axis Labels to Graphs
In MATLAB, an axes label is a text string aligned with the x-, y-, or z-axis in a graph. Axis labels can help explain the meaning of the units that each axis represents.
| Note
While you can use free-form text annotations to create axes labels, it is
not recommended. Axis labels are anchored to the axes they describe; text
annotations are not. If you move or resize your axes, the labels automatically
move with the axes. Additionally, if you cut a label and then paste it back into
a figure, the label will no longer be anchored to the axes.
|
To add axes labels to a graph, you can use any of these mechanisms:
Using the Label Options on the Insert Menu
- Click on the Insert menu and choose the label option that corresponds to the axes you want to label: X Label, Y Label, or Z Label. MATLAB opens a text entry box along the axes, or around an existing axes label.
| Note
MATLAB opens up a horizontal text editing box for the Y- and Z- axes
labels and automatically rotates the label into alignment with the axes when
you finish entering text.
|
- Enter the text of the label, or edit the text of an existing label.
- Click anywhere else in the figure background to close the text entry box around the label. If you click on another object in the figure, such as an axes or line, you close the label text entry box but also automatically select the object you clicked on.
| Note
After you use the Insert menu to add an axes label, plot edit mode is
enabled in the figure, if it was not already enabled.
|
Using the Property Editor to Add Axis labels
To add labels to a graph using the Property Editor:
- Start plot editing mode by selecting Edit Plot from the figure Tools menu
- Start the Property Editor by either double-clicking on the axes in the graph or by right-clicking on the axes and selecting Properties from the context-sensitive pop-up menu.
- The Property Editor displays the set of property panels specific to axes
objects.
- Select the X, Y, or Z panel, depending on which axis label youwant to add. Enter the label text in the Label text entry box.
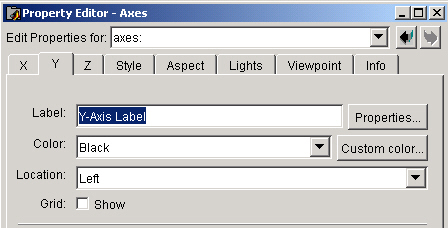
- Click Apply.
Rotating Axis Labels
You can rotate axis labels using the Property Editor:
- Start plot editing mode by selecting Edit Plot from the figure Tools menu.
- Display the Property Editor by selecting (left-click) the axis label you want to rotate. Right-click on the selected text then choose Properties from the pop-up menu.
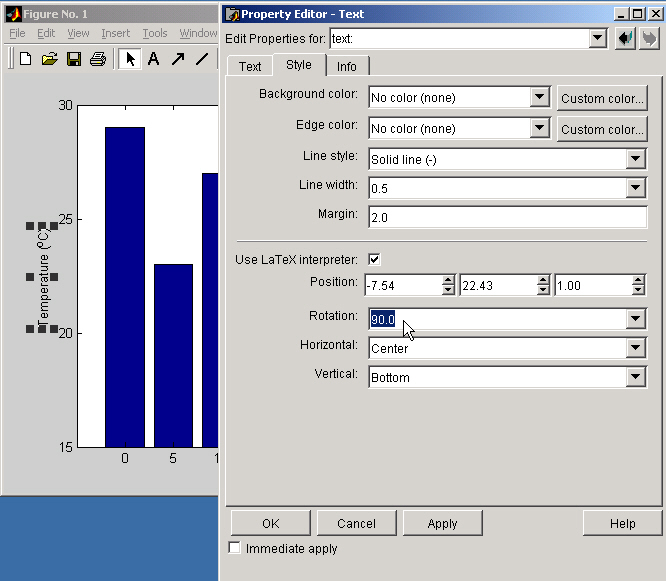
- Select the Style panel and enter a value for the orientation in the Rotation text field. A value of 0 degrees orients the label in the horizontal position.
- Click Apply.
- With the left mouse button down on the selected label, drag the text to the desired location and release.
Using Axis-Label Commands
You can add x-, y-, and z-axis labels using the xlabel, ylabel, and zlabel commands. For example, these statements label the axes and add a title.
xlabel('t = 0 to 2\pi','FontSize',16)
ylabel('sin(t)','FontSize',16)
title('\it{Value of the Sine from Zero to Two Pi}','FontSize',16)
The labeling commands automatically position the text string appropriately. MATLAB interprets the characters immediately following the backslash "\" as TeX commands. These commands draw symbols such as Greek letters and arrows.
See the text String property for a list of TeX character sequences. See also the texlabel function for converting MATLAB expersions to TeX symbols.
Rotating Axis Labels Using Commands
Axis labels are text objects that you can rotate by specifying a value for the object's Rotation property. The handles of the x-, y-, and z-axis labels are stored in the axes XLabel, YLabel, and ZLabel properties respectively.
Therefore, to rotate the y-axis so that the text is horizontal:
- Get the handle of the text object using the axes
YLabel property:
- Set the
Rotation property to 0.0 degrees
For example, this statement rotates the text of the y-axis label on the current axes:
Repositioning Axis Labels
You can reposition an axis label using
- Start plot editing mode by selecting Edit Plot from the figure Tools menu.
- Select the text of the label you want to reposition (handles appear around the text object).
- With the left mouse button down on the selected label, drag the text to the desired location and release.
| | Editing the Legend | | Adding Text Annotations to Graphs | |