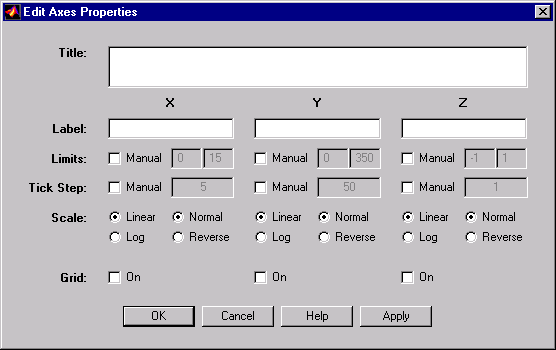
Setting Axes Properties
To set axes properties, such as the title:
- 1
- Start plot edit mode.
- 2
- Click in an empty area of the axes to select the axes and then select Axes
Properties from the Tools menu. Or in an empty area of the axes,
right-click and select Properties from the pop-up menu, or double-click in
an empty area of the axes.
- The Edit Axes Properties dialog box opens.
Note:
If you have a two-dimensional graph, the fields for the Z axis will not appear in the dialog box.
- 3
- Complete the fields in the dialog box and click Apply or OK to make the
changes.
- See these topics for more information:
Axes Title and X, Y, and Z Labels
In the Edit Axes Properties dialog box, type the text for the axes Title and for the X, Y, and Z labels. For the Title, press the Return or Enter key to advance text to the next line. The title text is added in the center at the top of the plot and the axes labels are centered along their respective axes.
Changing Titles and Labels.
You can change the text in the title and labels. See Changing Text, Arrows, and Lines for instructions. The changes you can make include:
If you do not want the y-axis label to appear vertically, or you do not want a multiline title to be center-justified, create the label or title as a text annotation.
Axes Limits
In the Edit Axes Properties dialog box, set axes Limits.
If the Limits Manual box is not checked, MATLAB automatically sets axes limits based on the range of specified data. The limit values MATLAB selects appear in the Limits edit boxes.
If you want MATLAB to set axes limits automatically but the Manual box is checked, uncheck the Manual box. The values MATLAB selects appear in the Limits edit boxes when you click Apply.
Set Minimum and Maximum.
If you want to specify limits for any of the axes, check the Manual checkbox. Then enter the minimum value in the left Limits edit box and the maximum value in the right Limits edit box for that axis.
Axes Tick Step
In the Edit Axes Properties dialog box, set the Tick Step for the axes.
If the Tick Step Manual box is not checked, MATLAB automatically sets tick mark spacing based on the data range. The tick step values that MATLAB selects appear in the Tick Step edit boxes.
If you want MATLAB to set tick mark spacing automatically but the Manual box is checked, uncheck the Manual box. The values MATLAB selects appear in the Tick Step edit boxes when you click Apply.
Specify Spacing.
If you want to specify tick mark spacing for any of the axes, check the Manual checkbox. Then enter the tick step value in the Tick Step edit box for that axis. For example, 10, sets a tick mark every 10 units. Set the value to 0 if you do not want tick marks displayed for that axis. You cannot manually set the tick step if the axes scale is set to Log.
Axes Scale
In the Edit Axes Properties dialog box, set the Scale properties for each axis.
Linear or Log.
Select a linear or logarithmic scale.
Normal or Reverse.
Select the direction for increasing values. This figure illustrates the directions.

See the axes property XDir for more information.
Axes Grid
In the Edit Axes Properties dialog box, check the Grid On box to add gridlines perpendicular to that axis, one line for each tick mark. Uncheck the box to remove the gridlines.
Example - Setting Axes Properties
This example sets axes properties for the plot of the Lotka-Volterra model of predator/prey populations. The figure below shows how the plot looks after setting axes properties.
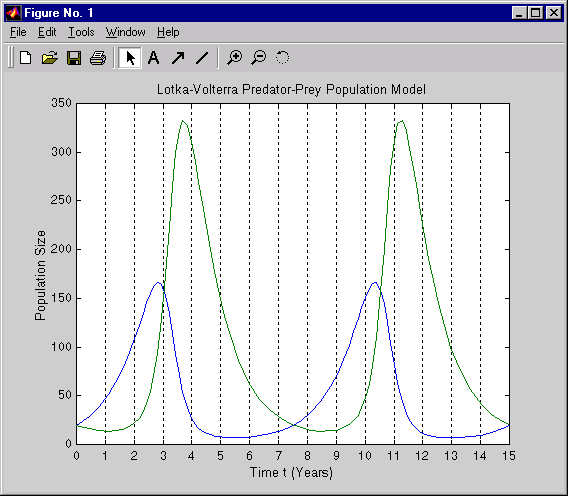
- 1
- Create the Lotka-Volterra plot using 0 to 15 years as the time frame and an
initial population size of 20 for both predators and prey.
[t,y]=ode23('lotka',[0 15],[20;20])
plot(t,y)
- 2
- Click the selection arrow button in the toolbar to start plot edit mode.
- 3
- Double-click in an empty area of the axes.
- The Edit Axes Properties dialog box appears.
- 4
- Make changes to the Title, X and Y Label, X Tick Step, and X Grid fields
as shown below, then click OK.

- The dialog box closes and the figure window reflects the changes.
MATLAB Commands for Axes Properties
If you need to change the axes properties in a way that the Plot Editor does not support, you might be able to make the change using the axes command. The tooltips for the fields in the Edit Axes Properties dialog box provide the name of the corresponding axes property.
[ Previous | Help Desk | Next ]