| Using Simulink | |
The Look-Up Table Editor allows you to inspect and change the table elements of any look-up table (LUT) block in a model (see Look-Up Tables in the online Simulink documentation), including custom LUT blocks that you have created, using the Simulink Mask Editor (see Editing Custom LUT Blocks). You can also use a block's parameter dialog to edit its table. However, that requires you to open the subsystem containing the block first and than its parameter dialog box first The LUT editor allows you to skip these steps. This section explains how to open and use the LUT editor to edit LUT blocks.
| Note You cannot use the LUT Editor to change the dimensions of a look-up table. You must use the block's parameter dialog box for this purpose. |
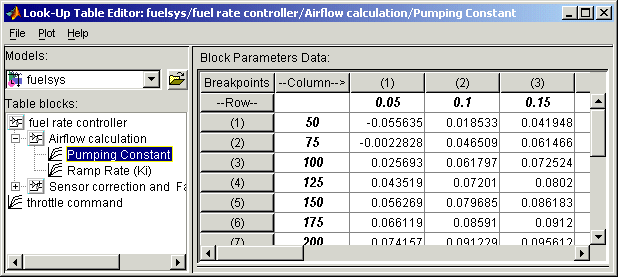
To open the editor, select Look-up table editor from the Simulink Tools menu. The editor appears.
The editor contains two panes. The pane on the left is a LUT block browser. It allows you to browse and select LUT blocks in any open model (see Browsing LUT Blocks). The pane on the right allows you to edit the selected block's look-up table (Editing Table Values).
Browsing LUT Blocks
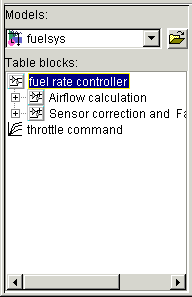
The Models list in the upper left corner of the LUT Editor lists the names of all models open in the current MATLAB session.To browse any open model's LUT table blocks, select the model's name from the list. A tree-structured view of the selected model's LUT blocks appears in the Table blocks field beneath the Models list.
The tree view initially lists all the LUT blocks that reside at the model's root level. It also displays any subsystems that contain LUT blocks. Clicking the expand button (+) to the left of the subsystem's name expands the tree to show the LUT blocks in that subsystem. The expanded view also shows any subsystems in the expanded subsystem. You can continue expanding subsystem nodes in this manner to display LUT blocks at any level in the model hierarchy.
Clicking any LUT block in the LUT block tree view displays the block's look-up table in the right hand pane, allowing you to edit the table (seeEditing Table Values).
| Note If you want to browse the LUT blocks in a model that is not currently open, you can command the LUT Editor to open the model. To do this, select Open from the LUT Editor's File menu. |
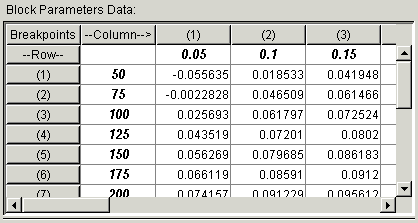
Editing Table Values
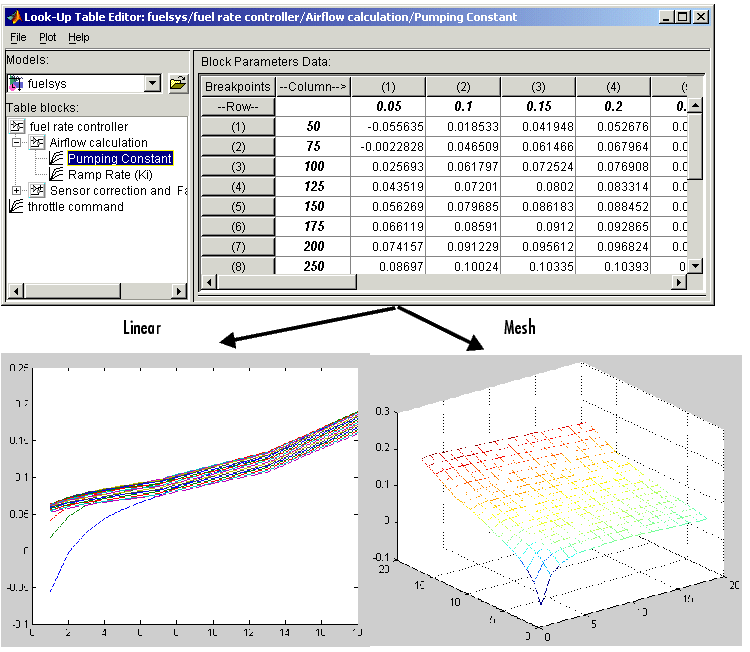
The Block parameters data table view of the LUT Editor allows you to edit the look-up table of the LUT block currently selected in the adjacent tree view.
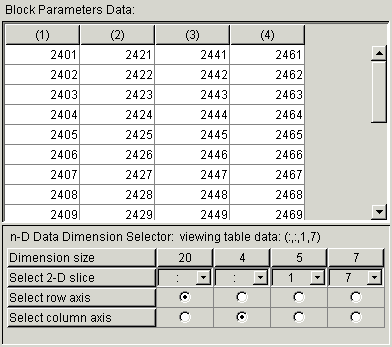
The table view displays the entire table if it is one- or two-dimensional or a two-dimensional slice of the table if the table has more than two dimensions (see Displaying N-D Tables). To change any of the displayed values, double-click the value. The LUT Editor replaces the value with an edit field containing the value. Edit the value, then press Return or click outside the field to confirm the change.
The LUT Editor records your changes in a copy of the table that it maintains. To update the copy maintained by the LUT block itself, select Update block data from the LUT Editor's File menu. To restore the LUT Editor `s copy to the values stored in the block, select Reload block data from the File menu.
Displaying N-D Tables
If the look-up table of the LUT block currently selected in the LUT Editor's tree view has more than two dimensions, the editor's table view displays a two-dimensional slice of the table.
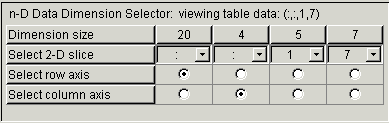
The n-D Data Dimension Selector beneath the table specifies which slice currently appears and allows you to select another slice. The selector consists of a 4-by-N array of controls where N is the number of dimensions in the look-up table. Each column corresponds to a dimension of the look-up table. The first column corresponds to the first dimension of the table, the second column to the second dimension of the table, and so on. The top row of the selector array displays the size of each dimension. The remaining rows specify which dimensions of the table correspond to the row and column axes of the slice and the indices that select the slice from the remaining dimensions.
To select another slice of the table, click the Select row axis and Select column axis radio buttons in the columns that correspond to the dimensions that you want to view. Then select the indexes of the slice from the popup index lists in the remaining columns.
For example, the following selector displays slice (:,: ,1,7) of a 4-D table.
Plotting LUT Tables
Select Linear or Mesh from the Plot menu of the LUT Editor to display a linear or mesh plot of the table or table slice currently displayed in the editor's table view.
Editing Custom LUT Blocks
You can use the LUT Editor to edit custom look-up table blocks that you or others have created. To do this, you must first configure the LUT Editor to recognize the custom LUT blocks in your model. Once you have configured the LUT Editor to recognize the custom blocks, you can edit them as if they were standard blocks.
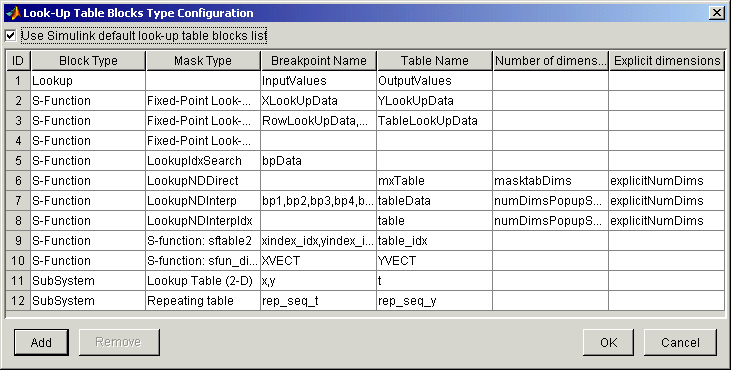
To configure the LUT editor to recognize custom LUT blocks, select Configure from the editor's File menu. The Look-Up Table Blocks Type Configuration dialog box appears.
By default the dialog box displays a table of the types of LUT blocks that the LUT Editor currently recognizes. By default these are the standard Simulink LUT blocks. Each row of the table displays key attributes of a LUT block type.
Adding a Custom LUT Type
To add a custom block to the list of recognized types,
Removing Custom LUT Types
To remove a custom LUT type from the list of types recognized by the LUT Editor, select the custom type's entry in the table in the Look-Up Table Blocks Type Configuration dialog box. Then select Remove. To remove all custom LUT types, check the check box labeled Use Simulink default look-up table blocks list at the top of the dialog box.
| | Controlling and Displaying Block Execution Order | Working with Block Libraries | |